Friday, November 14, 2014

Novemeber DIY


brought to you by The Charm Hunter


Handcrafted by One Charming Treasure
     Add a Charm Bangle Bracelets

Handcrafted by One Charming Treasure

Why do these make the perfect gift?  
They're cute, easy, & inexpensive to make!

~~~~~~~~~~~~~~~~~~~

Who doesn't like a bangle?  They're fun and easy to wear 
and the best part is that one size fits all!  They are adjustable 
and expandable to fit any size wrist.  You can add as few
or as many charms as you wish and personalize for the
person you're making it for :)

Handcrafted by One Charming Treasure

Follow these quick and easy steps:


SUPPLY LIST:  

                        wire cuff bracelets
                        charms and/or beads
                        4 - 6 mm jumprings (depending on wire diameter)
                        2 pairs of pliers


STEP 1:  

Gather your supplies.  You can find expandable, adjustable wire cuff
bangle bracelets at your local craft store or on line.  Amazon has several
styles available in a variety of finishes.  While the styles may vary slightly, 
they all have a "locking" mechanism that prevents the charms from
sliding off.  The most popular and least expensive are silvertone/goldtone.
Silver/gold plated as well as sterling silver metals are also available
depending on how much you want to spend.  I would recommend a sliver
or gold plated, as the finish will last much longer than the silver or goldtone
and they are just a few dollars more.  These below are listed at $5.25 ea.

            
Silver Plated
Gold Plated


STEP 2:

Gather your charms!  You can use charms, beads, photo charms, 
beach glass, shells, pearls, just about anything that has a hole 
(or that you can drill a small hole in).  If your charms don't come 
with jumprings already attached, you will need to add them to attach
to your bangle.  Use pliers to attach jumprings, add to bangle and then
securely close.  If you are not familiar with jumprings, read this quick 
and easy tutorial first.

STEP 3:

Personalize by adding charms, dangles and handstamped tags.  You
can add to both the "fixed/locked" area of the bangle, as well as the
to the rest of the bangle.


- Wallah! -


Add as few OR as many as you wish!


The options are ENDLESS !
                                  

YOU can do this !

I hope this project has inspired you!

Aloha, Susan


       Visit My Shop             Visit My Website

Monday, October 20, 2014

October's

Brought to you by The Charm Hunter

Handcrafted by The Charm Hunter
Heavenly Earrings

Bronze filigree cross earrings with chain and red garnet quartz gemstones

by

These are very easy to make and you can choose whatever color you like.
Since we're about to enter into the CHRISTmas Season, I chose red garnets.


----------------------------------


The supplies are pretty basic and you may already have all the elements 
to make these.  If not, the parts are inexpensive to purchase.

I love vintage crosses and religious medals.  They combine beautiful
art work with spiritual meaning.  Religious medals make wonderful
elements to work with in assemblage charm jewelry.


Supplies:

  • Two filigree crosses; look for ones with scrolls, loops and spaces
  • Loose chain link, ideally in the same finish as your cross
  • (4) 7mm jumprings and (4) 5mm jumprings, in the same finish
  • Four tear shape/pear shape or similar beads
  • Two ear wires, in same finish


Tools:
  • Two pair of pliers
  • One pair cutting pliers/nippers
  • Ruler


I always say in every post to NEVER throw away your broken jewelry. 
 Keep everything.  You can always use their spare parts in other projects, as shown today.


Step 1:


Organize your supplies.  The brass ornate crosses I chose are approximately 
2 1/4" x 1 1/2".  I cut a piece of brass chain into (2) 4" lengths after draping over the 
cross to see how long I wanted the chain to hang.


Step 2:


Use your pliers to pry open each 7mm jumpring and attach to each end of the chains.  Before closing the jumprings, attach each end to the outer ends of the cross in the outermost opening you can find.  Use your pliers to securely close the jumprings.  If you are not familiar with jumprings, read this quick and easy tutorial first.


Step 3:     


Now the fun part.......selecting the jewels!
I have a huge collection of Vintage jewels, but the hard
part was finding FOUR matching beads!  They can be made of
glass, plastic, acrylic, pearl or stone, and of course in any color!


 Decisions, decisions, decisions....


Step 4: 


I really wanted to use a teal or aqua blue, (my favorite), but I didn't have 
four matching pieces.  So I decided that since CHRISTmas is just 
around the corner, I chose red garnet teardrop stones.

Use your pliers to dis-assemble (if applicable) the stones.  If you've
purchased new stones your all set.  Use the 5mm jumprings to
attach your stones to another opening in your filigree cross,
preferably an inward area so that it falls inside the hanging chain.
Lastly, use your pliers to attach earwires.


NOTE:  Your jumpring sizes may vary depending on the 
opening size you have on your particular cross


**--- Wallah! ---**


You can do this!

I hope you've enjoyed this month's project
and that I've inspired you!

Aloha, Susan

Tuesday, September 16, 2014

Travel Charm Bracelet


September's DIY Project


Charm Bracelet

Brought to you by The Charm Hunter

 I love to travel and always save memorabilia, currency and coins that from around the world. What a wonderful idea it is to a charm bracelet using these coins and charms to remind you of your travels, like a scrapbook on your wrist!


Original design by The Charm Hunter
Custom made to order on Etsy


The supplies are pretty basic....


Supplies:
  • Coins, tokens, travel charms
  • Chain link bracelet (I used an old one I had on hand!)
  • 9mm and 11mm Jumprings
  • Small square of scrap wood
  • Clamp

Tools:
  • Hand Held Electric Drill 
  • 1/8” Pilot Point drill bit (or drill bit specifically for metal)
  • Needle nose pliers (Jewelers pliers would be even better)
  • Brass or Copper polish (optional) OR ketchup!

Step 1

Heads up! This project involves power tools and other sharp objects. Please use precaution and style yourself up with the proper safety gear (like goggles or gloves) when necessary.  Proceed at your own risk!

Look for drill bits specifically made for metal.
Either 3/32" or 1/8" makes a good hole size for charms

First you’ll need to identify where you’d like the hole in your coin and then position it accordingly.  I used a small block of wood and clamp to help stabilize coin.  Carefully and slowly begin drilling the hole through the coin.  Be patient, this may take a full minute and several intervals to drill through the coin.  You'll know it's gone completely through when you feel the bit hit the wood block beneath the coin.  Repeat with remaining coins.
 Some metals are thicker than others

Step 2
Once all of the holes are drilled, you can polish up your coins if you want to! Some of these were a little grimy, so a quick clean up really helped! You can use store bought cleaners such as  Brasso, but you could use any formula meant to clean metals.  Make sure to use gloves and do this step in a well ventilated space.  BUT, did you know that plain old ketchup works too?  Ketchup is a great metal polish!  Squeeze on tarnished copper and brass, rub with a cloth and the brilliant metals should shine though in a few minutes.  Just rinse and buff.  Silver coins can be soaked in vinegar for a few minutes, rinsed and buffed as well.


Step 3
Assemble jumprings to each coin, token and travel charm.  If you are not familiar with using jumprings, view this quick and easy tutorial first. You can use two different pliers, a screw driver or dull knife.  Play around with this step and be patient.  Two pliers work best.  Repeat with all the elements you wish to add to your bracelet. 


Step 4


Lay your bracelet out and lay then out your coins and charms in different patterns to determine the final look. Play around with the placement and remember the bracelet will form a circle, so you will want to alternate colors and sizes.  You can use all coins or a combination of coins and travel charms.  Once you're happy with the placement, using the same jumpring technique in Step 3, attach them to your bracelet links.  Consider having the same amount of space (link spaces) in between each charm

You can use only coins for a simple look OR add travel charms as I have 

.


Wallah!    YOU can do this!


See more handmade charm jewelry here

You could do this project with a combination of so many little things! One reader on facebook suggested guitar picks! The sky is the limit! Just make sure you use the proper drill bit and allow one or two of your “charms” for trial and error!

As always, I would love for to share your travel charm bracelet with us here.


Warmest aloha, Susan
aka The Charm Hunter

Visit my website                Visit my shop


Monday, August 11, 2014

Vintage Watches

AUGUST JEWELRY DIY

brought to you by The Charm Hunter

"Vintage Watches" Bracelet


"Vintage Watches" Bracelet
This month's inspiration came from a jewelry catalog that featured a similar bracelet
for $190 !   I was like, what?!  I think I can make something similar for far less...
You know how I always stress NOT to EVER throw away broken or mismatched
jewelry or stuff that's just out of style.  You can re-use all those pieces into new creations,
which is what my blog exemplifies.  Vintage Assemblage.  Reusing, Recycling and
Repurposing Vintage jewelry pieces into beautiful new jewelry!


Supply List:

  • 5 watches, working or not
  • 20 gauge wire, silver or gold
  • 1 toggle closure
  • Scissors, Pliers, Wire cutters

Instructions:

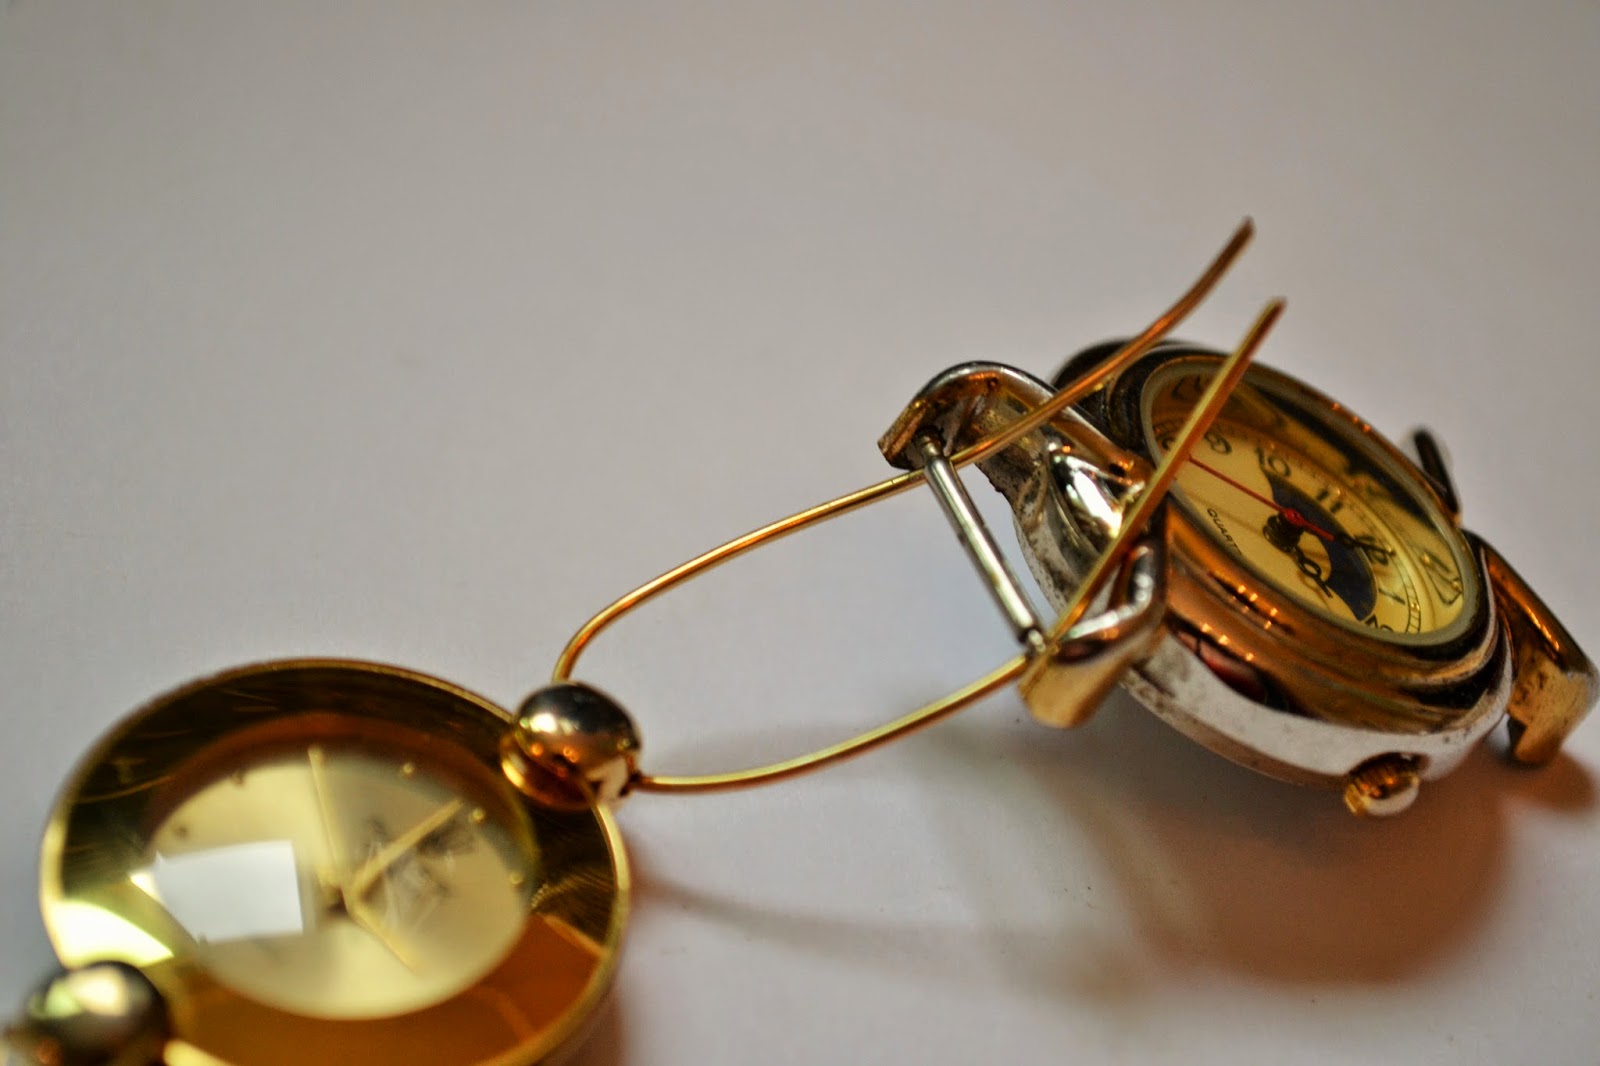
1.  Remove straps and watch bands. Leather ones can be
simply cut with scissors. Some metal bands are thin and
can also be cut with scissors. 


Thicker bands will need to be cut with wire cutters 
and plied off with pliers.


Some watches have a tiny "tension" bar.  If this falls out while removing the straps, it's very easy to "snap" back into place.


The end result that you want is the watch face center
with open ends for reattaching:


2. Repeat with remaining four watches.  Remove bands.


3. Using your 20 gauge wire, cut 3 inch strips. Fold into a 
loose " U " shape and weave through one end of watch face:


4.  Weave the other ends through the second watch face:

5.Pull through enough to leave about a half inch distance
between the watch faces.  With this excess of wire that
you've pulled through, use your pliers to do a simply
yet tight wrap, and just keep wrapping until there's no
more wire to wrap. Just pull and continue to wrap the wire
around and around.


Continue above steps until all watch faces are connected,
EXCEPT for two ends.  It's OK if the watch faces are NOT all
in the same direction.  This way it doesn't matter which way
you put the bracelet on...


6.Once you reach your two ends, assemble your toggle ends
using the same wire wrapping technique.  Remember, Wire Wrapping
101 is nothing difficult, just a simple twisting of wire.  Your
end result is NOT perfection, but a simple wrap around.

Whallah! 
How clever is this?

Wallah, wrist fancies!


A pretty gold and silver mix from a varied assortment


I hope this has inspired you!

See more at TheCharmHunter.com

Visit my shop here

Your questions and comments are always welcomed.

Warmest Aloha, Susan

Wednesday, July 23, 2014

JULY JEWELRY DYI

Brought to you by The Charm Hunter

A beautiful yet easy layered charm necklaces
Purchase Project Necklace


Supply List:

  • 6 strands of chain 
  • 1 rhinestone strand/necklace
  • 2 10mm jumprings
  • 3 charms
  • 1 clasp set

Instructions:

1. Pull out those unwanted chains and necklaces 
that you never wear, OR purchase some from your
local craft store.


2.  For this project, I chose six brass chains,
two of each style in lengths of 20 - 22 inches each.   


3.  Gather all the ends together and connect onto 
one jumpring.  If you are not familiar with using
jumprings, view this quick and easy tutorial first.
Repeat with the other ends of chain with the second
jumpring.


  4.  Attach necklace clasp.  Now you will have a 
    layered necklace strand of varying lengths.  


  5.  I added a rhinestone necklace to the strands
    for some added bling.  You can attach it to the
    jumrings or just wear as is on it's own resting on
    the layered chain necklace.


  6.   Last step - Add charms!  For this necklace
     I chose charms of Faith.  A Vintage crucifix, a wooden
     cross, and for the focal point, an antique metal saint
     charm.  This is a beautiful Italian religious charm I            recently found at an Antique Mall, which is a great
     shopping source to find the most unique jewelry elements
     to create your own jewelry assemblage projects.


+++++++++++++++++++++++++++++++++++++++++++++++++++++++++++++

I hope you've enjoyed this month's jewelry assemblage project!  Bookmark my blog and check back next month for more...


♥*¨)¸.•´¸.•*´¨) ¸.•*´¨)(¸.•´ (¸*´¨(♥ (¸.•´Thank you for visiting my blog. ¸.•´♥Read more about me and my jewelry at www.TheCharmHunter.com

Warmest Aloha, Susan